> ## Documentation Index
> Fetch the complete documentation index at: https://reseller-docs.wamatrix.io/llms.txt
> Use this file to discover all available pages before exploring further.
# Onboarding a Tenant
> Create tenants from the panel or let them register themselves.
Set up [**registration and email**](#registration-verification-settings), [**bot protection**](#bot-protection), and [**social login**](#social-login) before tenants start registering. These settings apply only to new registrations and do not affect existing tenants.
## Registration & Verification Settings
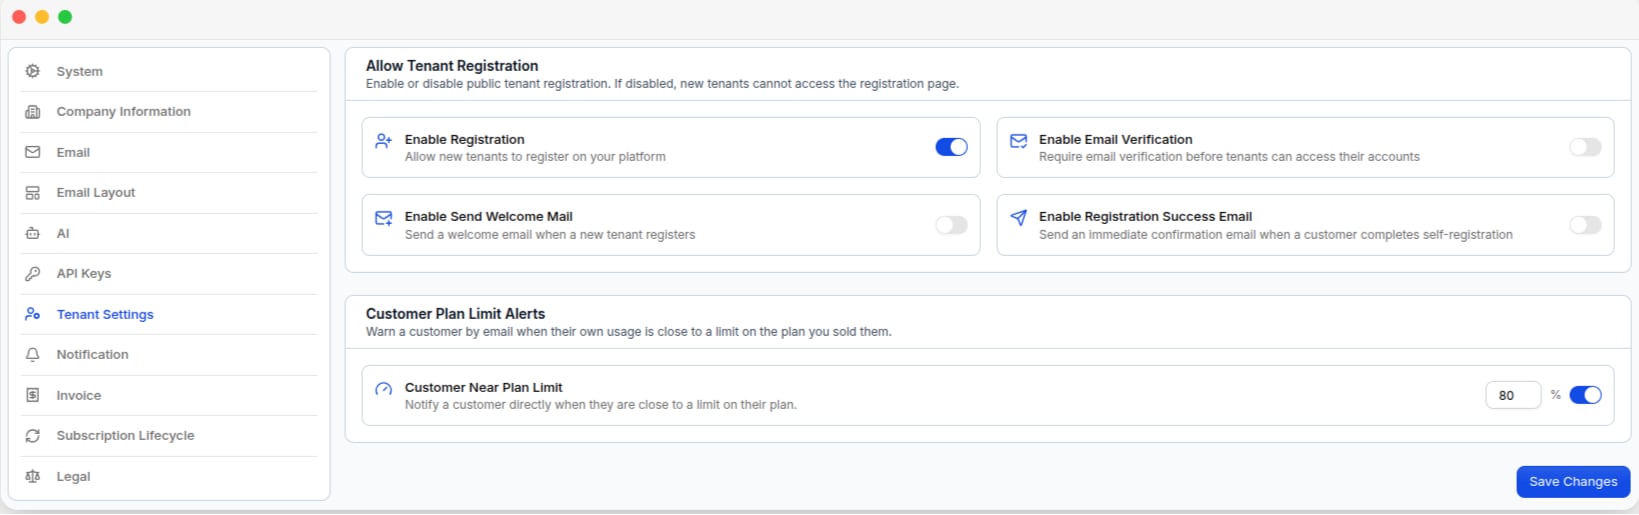
Go to **Settings → Tenant Settings**.
 ### Allow tenant registration
**Enable Registration** lets tenants create their own accounts. It is **enabled by default**.
When disabled, new registrations are closed, but existing tenants can continue using their accounts.
### Verification and emails
These settings are **off by default**:
| Setting | What it does |
| ------------------------------------- | --------------------------------------------------------------------------------------------------------------------------------- |
| **Enable Email Verification** | Requires tenants to verify their email before signing in. Verification links are valid for 60 minutes and can be sent again. |
| **Enable Registration Success Email** | Sends a confirmation email after registration. |
| **Enable Send Welcome Mail** | Sends a welcome email with the tenant's plan and dashboard link. If email verification is enabled, it is sent after verification. |
Only self-registered tenants need email verification. Tenants added from the panel and those signing in with Google or Facebook are already verified.
SMTP must be configured before verification emails can be sent.
## Tenant Plan Limit Alerts
**Tenant Near Plan Limit** sends an email when a tenant reaches the selected usage threshold. It is **off by default**.
The default threshold is **80%** and can be set from **50%–99%**.
This alert is sent to the tenant.
To receive alerts for the reseller's own plan, enable **Plan Limit Almost Reached** under **Settings → Admin Notifications**. These are separate settings.
## Bot Protection
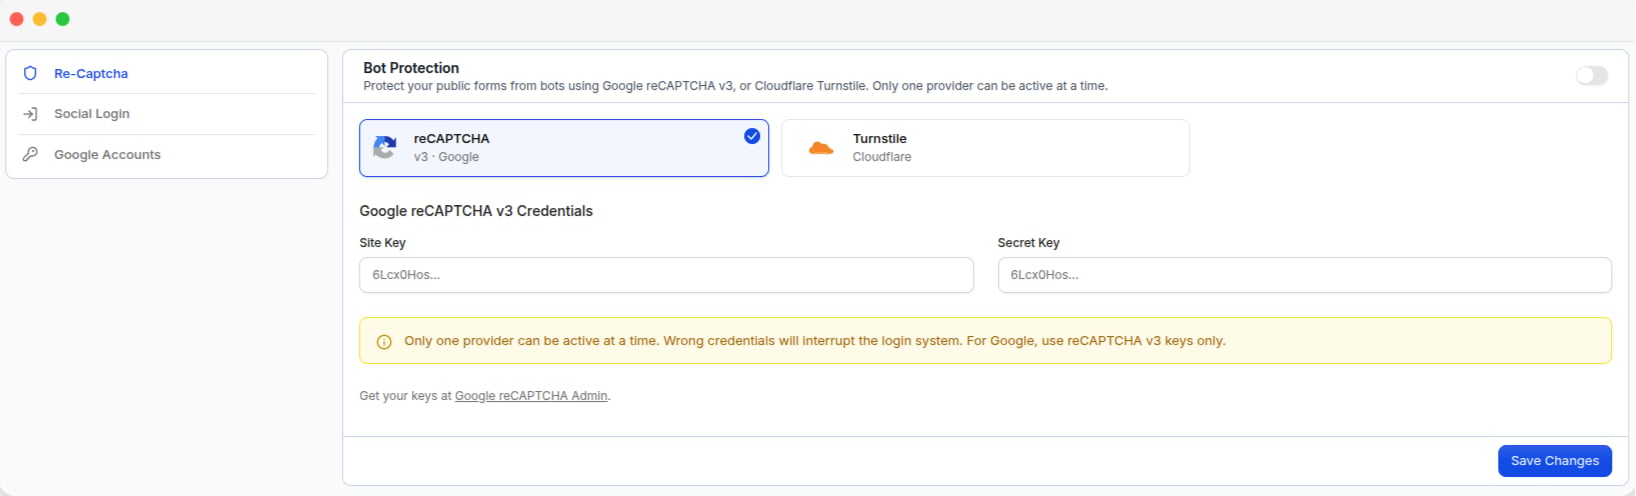
Go to **Settings → Re-Captcha** to protect login, password recovery, and tenant registration from bots.
### Allow tenant registration
**Enable Registration** lets tenants create their own accounts. It is **enabled by default**.
When disabled, new registrations are closed, but existing tenants can continue using their accounts.
### Verification and emails
These settings are **off by default**:
| Setting | What it does |
| ------------------------------------- | --------------------------------------------------------------------------------------------------------------------------------- |
| **Enable Email Verification** | Requires tenants to verify their email before signing in. Verification links are valid for 60 minutes and can be sent again. |
| **Enable Registration Success Email** | Sends a confirmation email after registration. |
| **Enable Send Welcome Mail** | Sends a welcome email with the tenant's plan and dashboard link. If email verification is enabled, it is sent after verification. |
Only self-registered tenants need email verification. Tenants added from the panel and those signing in with Google or Facebook are already verified.
SMTP must be configured before verification emails can be sent.
## Tenant Plan Limit Alerts
**Tenant Near Plan Limit** sends an email when a tenant reaches the selected usage threshold. It is **off by default**.
The default threshold is **80%** and can be set from **50%–99%**.
This alert is sent to the tenant.
To receive alerts for the reseller's own plan, enable **Plan Limit Almost Reached** under **Settings → Admin Notifications**. These are separate settings.
## Bot Protection
Go to **Settings → Re-Captcha** to protect login, password recovery, and tenant registration from bots.
 | Provider | Required keys |
| ------------------------ | ----------------------------------------------------------- |
| **Google reCAPTCHA v3** | Requires a **Site Key** and **Secret Key** from Google. |
| **Cloudflare Turnstile** | Requires a **Site Key** and **Secret Key** from Cloudflare. |
Only one provider can be active at a time. Bot protection is **off by default**.
Incorrect keys can prevent tenants from logging in, not just from registering. Make sure the keys match the selected provider before enabling bot protection.
## Social Login
Go to **Settings → Social Auth** to let tenants and reseller staff sign in with **Google** or **Facebook**. Both providers are **off by default**.
| Provider | Required keys |
| ------------------------ | ----------------------------------------------------------- |
| **Google reCAPTCHA v3** | Requires a **Site Key** and **Secret Key** from Google. |
| **Cloudflare Turnstile** | Requires a **Site Key** and **Secret Key** from Cloudflare. |
Only one provider can be active at a time. Bot protection is **off by default**.
Incorrect keys can prevent tenants from logging in, not just from registering. Make sure the keys match the selected provider before enabling bot protection.
## Social Login
Go to **Settings → Social Auth** to let tenants and reseller staff sign in with **Google** or **Facebook**. Both providers are **off by default**.
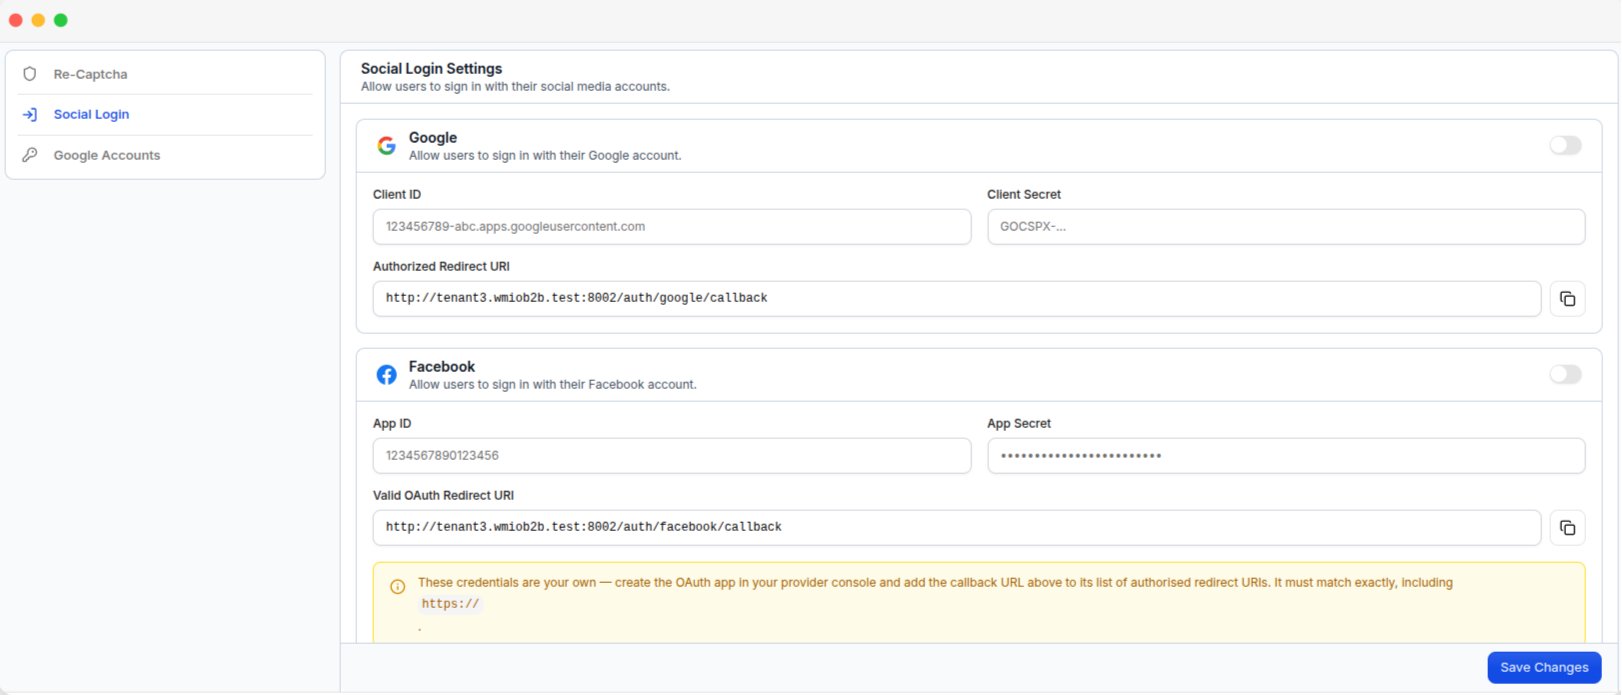 **Required credentials:** Client ID and Client Secret.
Add the redirect URL shown on this page to your Google developer console as the **Authorized Redirect URI**.
**Required credentials:** App ID and App Secret.
Add the redirect URL shown on this page to your Facebook developer console as the **Valid OAuth Redirect URI**.
A new tenant signing in with Google or Facebook for the first time gets an account created automatically.
Copy the redirect URL exactly as shown, including `https://`. If it does not match, social login will not work.
## Adding a Tenant
**Required credentials:** Client ID and Client Secret.
Add the redirect URL shown on this page to your Google developer console as the **Authorized Redirect URI**.
**Required credentials:** App ID and App Secret.
Add the redirect URL shown on this page to your Facebook developer console as the **Valid OAuth Redirect URI**.
A new tenant signing in with Google or Facebook for the first time gets an account created automatically.
Copy the redirect URL exactly as shown, including `https://`. If it does not match, social login will not work.
## Adding a Tenant
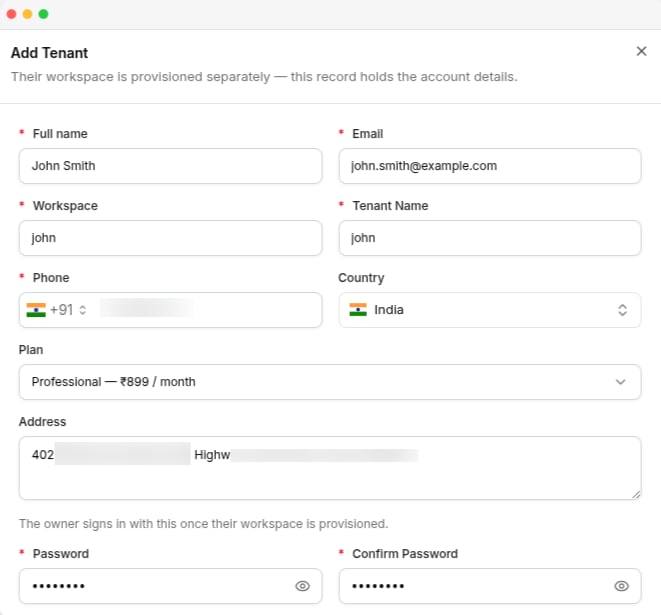 Go to **Tenants** and click **Add Tenant**.
| Field | Description |
| ------------------------------------- | ------------------------------------------------------------------------------------------------------------------------------ |
| **Full name** and **Email** | The tenant's name and email address. |
| **Workspace** | The tenant's business or company name. |
| **Tenant Name** | Used as the tenant's subdomain. Generated from the **Workspace** name using lowercase letters and numbers, and can be changed. |
| **Phone** | The tenant's phone number. **Country** and **Address** are optional. |
| **Plan** | Optional. Leave **Select a plan** if the plan will be assigned later. |
| **Password** and **Confirm Password** | Set and confirm the tenant's password. |
Click **Save**.
You must share the login details with the tenant separately.
When **Enable Registration** is enabled, tenants can create their own accounts and choose a plan during registration.
Their workspace is created automatically after registration.
## What the tenant sees
After signing in, tenants see the features and limits available on their plan. Features not included in the plan appear with a lock icon and an **Upgrade Plan** option.
To view the tenant's experience, go to **Tenant List → Impersonate**. A **You are impersonating this tenant** banner appears while active. Select **Stop Impersonating** to return to the reseller account.
Go to **Tenants** and click **Add Tenant**.
| Field | Description |
| ------------------------------------- | ------------------------------------------------------------------------------------------------------------------------------ |
| **Full name** and **Email** | The tenant's name and email address. |
| **Workspace** | The tenant's business or company name. |
| **Tenant Name** | Used as the tenant's subdomain. Generated from the **Workspace** name using lowercase letters and numbers, and can be changed. |
| **Phone** | The tenant's phone number. **Country** and **Address** are optional. |
| **Plan** | Optional. Leave **Select a plan** if the plan will be assigned later. |
| **Password** and **Confirm Password** | Set and confirm the tenant's password. |
Click **Save**.
You must share the login details with the tenant separately.
When **Enable Registration** is enabled, tenants can create their own accounts and choose a plan during registration.
Their workspace is created automatically after registration.
## What the tenant sees
After signing in, tenants see the features and limits available on their plan. Features not included in the plan appear with a lock icon and an **Upgrade Plan** option.
To view the tenant's experience, go to **Tenant List → Impersonate**. A **You are impersonating this tenant** banner appears while active. Select **Stop Impersonating** to return to the reseller account.